
When Arduino and Raspberry Pi released first versions, I did buy one of each. Being a gadget man and … well, a man, I played for a bit with my new toys and left them in a drawer.
Time has passed and not much happened with any of them. As I became increasingly unhappy with the central heating controller in my current house, I decided to take the Ino and Pi out of the drawer and actually build central heating controller that I would be happy with.
The design phase
First requirement of the new heating control system was the least intrusive installation as possible.
The dial thermostat that I have at home, works as a simple switch: switching the heating on when temperature falls bellow pre-set; and switching heating off when temperature rise above another pre-set. I decided to use this simplicity in my design. All I needed to do is hook with one 230V cable into that thermostat (230V, hell yeah).
With entry point sorted, I went into the controller bit. Arduino board will control the Relay, which will simply switch heating on/off. For the temperature reading I chose the Digital Thermometer which offered more stable reading than the Analog one (included in Arduino Uno starter kit). I’ve also added LED to indicate when the heating was on.
Leveraging serial port used to program Arduino, I decided that the board will send temperature updates and receive setup command from Pi via USB connection. It will also be powered via the same. This also solved a problem of 2 separate power adapters for both Arduino and Raspberry Pi.
The build phase
I’ve been trying few things before arriving with the below solution.
Electronics
The Arduino circuit is very simple.
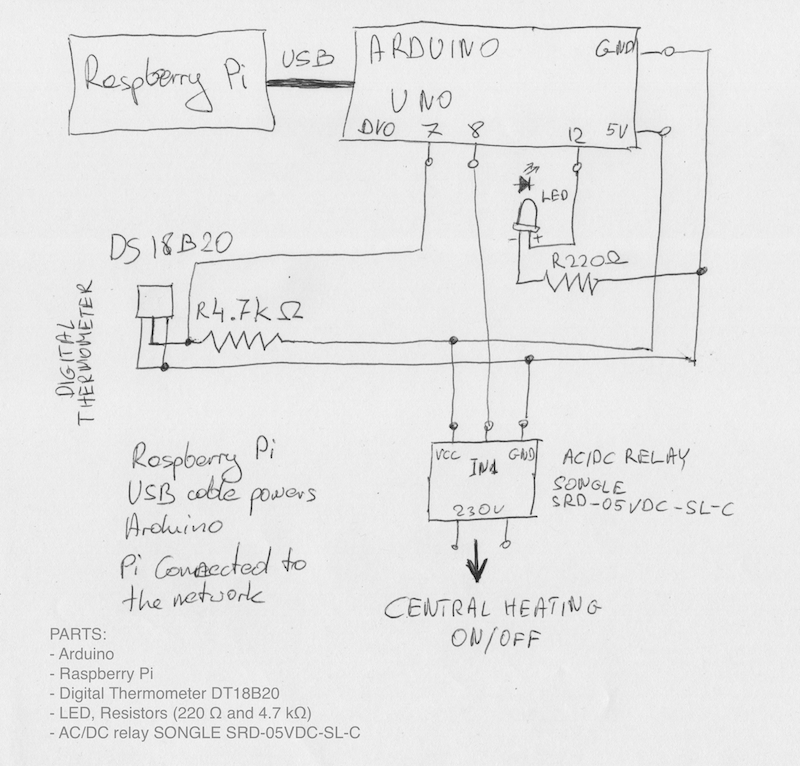
Three elements connected to Arduino with a couple of resistors, not much.
The LED is not necessary, it’s there to indicate when the heating is switched on.
The final prototype doesn’t look very attractive, but the lot is hidden under the furniture and the only elements sticking out are the temperature sensors and a bit of LED.
Final prototype of my controller


Software
I had to write three separate pieces of software:
- Arduino code that reads current temperature and controls the Relay, https://github.com/greggigon/Home-Temperature-Controller/tree/master/arduino
- Raspberry Pi code that communicates with Arduino and exposes REST API for the UI https://github.com/greggigon/Home-Temperature-Controller/tree/master/temperature-sensor-and-rest
- UI Code, simple web app that runs on any device and communicates with Pi via REST API https://github.com/greggigon/Home-Temperature-Controller/tree/master/ui/mobile-web-ui
Arduino
For the temperature sensor I included two extra libraries, the OneWire protocol library and a DallasTemperature sensor library. I use 0.5 centi-degree approximation of a temperature reading.
Temperature reads are sent via Serial Port on every loop. Arduino also expects the Float number on a Serial Port. The received number indicates the desired room temperature for Arduino.
To limit the sensor reading fluctuations, the control of relay changes after at least 10 successful consecutive reads of the same temperature from the sensor.
Raspberry Pi
The software that runs on Raspberry Pi does the following:
- It waits on the temperature updates from Arduino, and stores the Updates in Memory (for the latest update) and in simple file based H2 database (for historical data),
- It exposes REST API for UI to get the temperature information and receive the new settings,
- It schedules temperature changes according to schedule stored in the JSON file.
I started the code in Python, but it was running slow. I did a simple comparison of execution time for Prime number algorithms, and Java 8 was beating Python. On a single core Raspberry Pi 1, it was a good incentive to change the platform. I chose Kotlin programming language as it was new to me and I wanted to learn it.
As a framework for Event driven application I choose Vert.x 3. For Serial Port communication, a bit dated RXTX library.
The UI / Phone controller app
The Web App I build works on computers as well as mobile devices. I did choose React as a UI framework with Material UI components. The lot is build with Webpack into a small set of html/js files.


The testing phase
The testing phase involved connecting everything together, starting it, and hoping that I will not sense the smell of burning electrics and experience no explosions. In other words, a standard scientific and engineering approach 🙂 .
I do run the setup for 4 weeks continuously and it not failed so far.
Summary
This is the first time I used my skills to build something that interacts with physical world. It gave me a great feeling of achievement and satisfaction. I know that I could buy something that looks much nicer and probably works better but I learned a lot during the process.
Raspberry Pi 3 was released while I was building my design and I switched to it. You can see it in the pictures. I also want to switch Arduino Uno prototyping board to Arduino Nano.
All the code and more detailed technical description is available for you to grab from my GitHub repository on https://github.com/greggigon/Home-Temperature-Controller .

Mad skills buddy!
Haha 🙂 Thanks
Hi Greg
I read your article with interest as I am looking for a heating control system for my multiple heating zone house.
Like you, I am looking at the Arduino and/or the Raspberry pi as well as the DS18B20 as the actual temperature sensor.
I want to do exactly what you are doing but for multiple zones. The issue then becomes communications with the temperature sensor. I have an extensive LAN so could connect raspberry Pis to it to provide the necessary communication link via Ethernet (possibly using the Raspberry Pi Zero). Also I have been reading up about the DS18B20 and see that you can connect these serially on a two or three wire connection to one raspberry pi with each sensor providing a temperature for each zone. The raspberry pi could be located near the heating actuators and operate the relays to do this. This design could potentially deal with a larger heating system and it eliminates the Arduino. One may need multiple raspberry pis – one for each group of zones – in my case this would probably be an under floor heating manifold. Then the LAN (or even a wi-fi link but we don’t believe in these) could provide the communication between the raspberry Pis and the actual controller program located on a PC or other remote device like a mobile.
Essentially I am taking your design and cutting out the Arduino and having multiple sensors to each raspberry pi.
The issues I have looked at are
1 length of communication between sensors and Pi – looks like it could be many meters or even 10s of meters without a problem
2 ability for Pi do this – Pi zero could provide the link to the Ethernet with an otg usb connection and the web servier could be located on it
3 not sure how to cope with multiple Pis which would be necessary because of the distance between the 5 underfloor heating manifolds I have – too many sensors to expect all the DS18B20’s to connect to one Pi.
I would be very interested in your comments as I have put in quite a lot of design time on this already
Kind regards
Gordon Webb
Hi Gordon
I actually did cut out Arduino from my design as well. Connecting DS18B20 directly to Raspberry PI. I did have some stability problems where sensor would get stuck reporting invalid temperature and I had to reconnect the sensor to get it to work again. Might be some bug in the Kernel Module used by Raspberry PI.
It is indeed possible to connect multiple DS18B20 on a single wire.
The only problem with multiple RPI is that you have to control multiple RPIs 🙂
Your design seems like a good idea. Good luck with the implementation.