How to use Gradle Wrapper to build project in TeamCity inside enterprise network

Gradle is a great tool for building projects. I’m using it to build Java and Groovy modules. TeamCity is a Continuous Integration server that many teams are using in RBS.

We have a rather large farm of build agents. Some of them are specifically build to suit various build requirements (for example OS, or Browser version). However, majority of the Agents are generic and could be used by any build and project.

By default we don’t have Gradle distribution installed on those TeamCity agents. TeamCity doesn’t come with bundled version of Gradle either. We could install versions of Gradle on the Agents, however it’s impractical due to the number of the Agents and the fact that there is many distributions of Gradle that could be required.

Solution to that problem could be Gradle Wrapper. Gradle Wrapper contains few files that you should include as a part of your project.

In this article I will introduce Gradle Wrapper, how to use it and how to set it up in TeamCity so it works behind firewall/proxy in enterprise network.

IntelliJ Project view with Gradle Wrapper files

The main role of wrapper is to Download distribution of Gradle and execute the build independently of the platform.

The interesting bit is that you can use Gradle to generate those files.

Creating Gradle Wrapper files

The Gradle Wrapper files could be copied from another project or generated using Gradle Wrapper task.

task prepareWrapper(type: Wrapper) {
   gradleVersion = '1.4'
}

The above lines show how to create the wrapper task in your project build.gradle file. There are number of properties that you can set. I will discuss those further. Documentation for those properties can be find at Gradle documentation page: http://www.gradle.org/docs/current/dsl/org.gradle.api.tasks.wrapper.Wrapper.html

Results of Execting Prepare Wrapper
Results of executing Prepare Wrapper

The task will generate folders and files that could be seen in the top picture of this post.

Using Gradle Wrapper 

You should be able to use Gradle Wrapper in the same way you use Gradle from your command line.

Using gradle wrapper script to list the tasks.
Using Gradle wrapper script to list the tasks.

When you execute the Wrapper for the first time it will download the distribution first (just as you can see on the picture above).

You could face first problem if you are inside a corporate network, behind a firewall and proxy.

Setting Wrapper to work behind Proxy

There are two ways you can address the issue:

  1. Setup proxy details on your Gradle Wrapper Script
  2. Provide Wrapper Distribution URL somewhere reachable within your corporate network

To setup proxy details you could modify gradlew and gradlew.bat files. Top of both files contain DEFAULT_JVM_OPTS system variable that you could set. For example:

#!/usr/bin/env bash

##############################################################################
##
##  Gradle start up script for UN*X
##
##############################################################################

# Add default JVM options here. You can also use JAVA_OPTS and GRADLE_OPTS to pass JVM options to this script.
DEFAULT_JVM_OPTS="-Dhttp.proxyHost=proxy.host.net -Dhttp.proxyPort=8080 -Dhttp.proxyUser=proxy.user -Dhttp.proxyPassword='awesome-password"

To provide alternative Gradle Distribution URL you can set it up before you generate Gradle Wrapper files in your task of the build.gradle file.

task prepareWrapper(type: Wrapper) {
   gradleVersion = '1.4'
   distributionUrl = 'alternative.location'
}

Or alternatively you can modify the gradle/wrapper/gradle-wrapper.properties file.

#Wed Feb 27 11:54:01 GMT 2013
distributionBase=GRADLE_USER_HOME
distributionPath=wrapper/dists
zipStoreBase=GRADLE_USER_HOME
zipStorePath=wrapper/dists
distributionUrl=http://some.location.net/gradle-distributions/gradle-1.4-bin.zip

The benefits of first approach is that you don’t need to host Gradle distribution anywhere within your network. The minus is when proxy requires authentication, you will need to put credentials in the file.

The benefits of a second approach is that you don’t need to modify gradlew script files and you don’t need to provide proxy user credentials. Also, distribution is hosted internally which potentially could mean faster downloads. The downside is the fact that you need to host it somewhere internally accessible via HTTP protocol.

Setting up TeamCity build

The task is relatively simple with only one hurdle to overcome. Once the Gradle Wrapped downloads the Gradle distribution, where does it actually put it, and where will the dependencies downloaded during build phase go.

TeamCity build setup page with Gradle Wrapper enabled

Note that I’ve not declared where are those directories that the downloads (Gradle distributions and build dependencies) will go. We can set this up in two places:

  1. gradle-wrapper.properties file
  2. TeamCity system property for the build

Setting the Wrapper Properties file

The gradle/wrapper/gradle-wrapper.properties file could be modified directly or setup during the prepareWrapper phase.

The prepareWrapper task:

task prepareWrapper(type: Wrapper) {
    gradleVersion = '1.4'
    distributionUrl = 'alternative.location'
    distributionBase='/some/location/on/agent/gradle'
    zipStoreBase='/some/location/on/agent/gradle'
}

The properties file:

distributionBase=/some/location/on/agent/gradle
distributionPath=wrapper/dists
zipStoreBase=/some/location/on/agent/gradle
zipStorePath=wrapper/dists
distributionUrl=http://some.location.net/gradle-distributions/gradle-1.4-bin.zip

Benefits of this approach is that you don’t have to configure anything specific in TeamCity. The downside is that you need to know in your script the details of Agent file system.

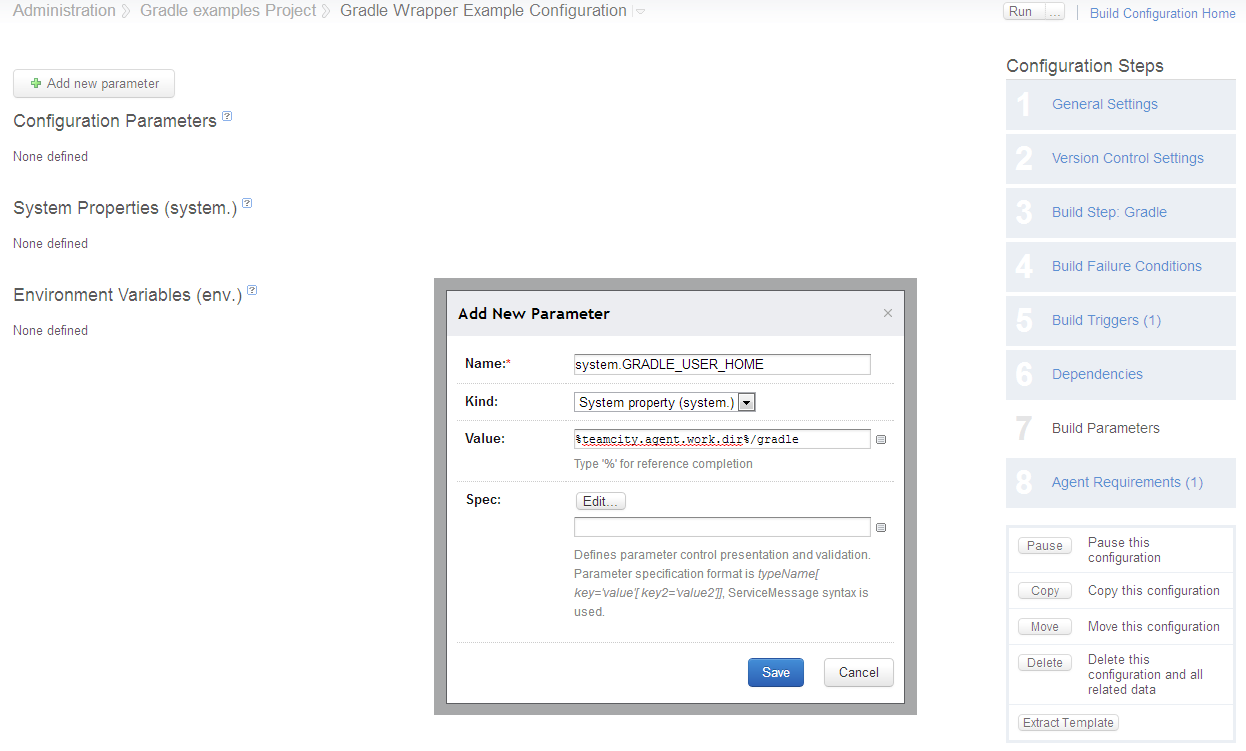
Setting the TeamCity system property

The system property to set should be the one referenced by gradle-wrapper.properties which is GRADLE_USER_HOME.

Example of TeamCity system property setup

At this point it is important to mention one thing: if the same GRADLE_USER_HOME is used within different builds, it could potentially save time on downloading Gradle distribution and build dependencies.

I wish you many happy builds.

Gradle IDEA plugin, configuration and usage

We are using Gradle as a build and release tool in our project. It’s flexible and does exactly what you expect from it, with no xml configuration magic.
Gradle IDEA plugin gave us a way of generating IntelliJ project and modules files out of the freshly checkout source with a single instruction.

Gradle IDEA plugin

All we needed to do is to include the plugin in out multi project setup and run the gradle idea tasks from the command line.

allprojects {
…
  apply plugin: ‘idea’
…
}

First time when we generated the files they were valid, however the module configurations needed few simple fixes. The IDEA plugins provide hooks into project and module generation that we used to amend the generated IntelliJ files.

Setting the Java version on the project


allprojects {
…
  ideaProject {
    javaVersion = '1.6'
  }
…
}

This code snipped sets version of JDK on the whole project, which in turns makes it ready for compilation in IntelliJ.

Moving module dependencies to the top of the list

Gradle IDEA plugin creates dependencies for all the modules, however it moves the dependencies between modules to the bottom of the list. For example, if module B has dependencies on module A plus some of it’s own JAR dependencies, the JAR will appear before the module A dependency.  It was problematic for our project.  The snippet below is using module configuration hook to reorder module dependencies to the top of the list.

allprojects {
…
  ideaModule {
    whenConfigured { module ->
      def moduleDependencies = []
        module.dependencies.each {
          if (it.class.simpleName == 'ModuleDependency') {
            if (it.scope.equalsIgnoreCase("COMPILE")) {
              moduleDependencies += it
            }
          }
        }
      module.dependencies.removeAll(moduleDependencies)
      def jarDependencies = new LinkedHashSet(module.dependencies)
      module.dependencies.clear()
      module.dependencies.addAll(moduleDependencies)
      module.dependencies.addAll(jarDependencies)
    }
  }
…
}

Adding defaults to Run configurations

We have also discovered that it was useful to add some extra defaults to Run configurations and to TestNG running configurations.

We did this with Idea Workspace hook and a bit of XML injection. Code bellow is the sample snipped we used.


allprojects{
...
  ideaWorkspace {
    withXml { provider ->
      def applicationDefaults = provider.node.component.find { it.@name == 'RunManager'}.configuration.find { it.@type == 'Application'}
      if (applicationDefaults != null) {
        applicationDefaults.option.find { it.@name == 'VM_PARAMETERS'}.@value = '-Xmx1024m -XX:MaxPermSize=256m -Xss64k'
        applicationDefaults.option.find { it.@name == 'WORKING_DIRECTORY'}.@value = 'file://$MODULE_DIR$'
      }
      def testNGDefaults = provider.node.component.find { it.@name == 'RunManager'}.configuration.find { it.@type == 'TestNG'}
      if (testNGDefaults != null) {
        testNGDefaults.option.find { it.@name == 'VM_PARAMETERS'}.@value = '-XX:MaxPermSize=128M -Xmx1024M'
        testNGDefaults.option.find { it.@name == 'WORKING_DIRECTORY'}.@value = 'file://$MODULE_DIR$'
      } else {
        def clonedNode = new XmlParser().parseText( XmlUtil.serialize(applicationDefaults))
        clonedNode.@type = 'TestNG'
        clonedNode.@factoryName = 'TestNG'
        provider.node.component.find { it.@name == 'RunManager'}.append(clonedNode)
      }
    }
  }
...

}

This snippet sets some default JVM parameters and working directory for running configurations.

The snippets made it possible for anyone to quickly get up and running on any clean machine with checked out project sources.

Cheers, Greg

Build script and project level variables (Gradle)

Following on my Introduction to Gradle here is a simple tip on script level variables.

Variables

I found out today that declaring something on the top level of a project build file doesn’t mean that all the Gradle blocks will see it. The problematic one is buildscript {}. It happens as buildscript section is evaluated before any other part of the script is.

So, for example:

myVariable = “I was here”

allProject {
  println “It will be here $myVariable”
}

buildscript {
  println “But it won’t be here $myVariable”
}

Defining variables on top level could be useful as they could be treated as constants and reused throught the script (I use those for repository URLs for example)

The easiest and simplest solution would be to put buildscript{} as a first block and declare all the variables inside.

buildscript {
  myVariable = “I was here”
  println “Here $myVariable”
}

allProject {
  println “.. and here $myVariable”
}

Buildscript block doesn’t have to be at the top but I feel it’s more elegant and clear as all the constants are on the top of the file that way.

Introduction to Gradle

For last few weeks I’ve been moving rather large collection of Ant, Shell and other scripts into Gradle. In my opinion Gradle is great. It has two things that I value the most when it comes to tools:

  1. The build scripts are CODE. As scripts are CODE I can do everything I could do when I code. It gives me freedom from XML
  2. It has dependencies management powered by Ivy.

Scripts are Code

The build scripts are Groovy code. Groovy is dynamic language that runs on JVM (similar to JRuby in some sense).  This means that I can test my build scripts with unit tests. This also means that I can do loops and conditions easier without weird, artificial XML tags.

Dependency management by Ivy

Gradle team, instead of inventing new dependency management, actually decided to use Ivy. Simple and easy tool that does what it says on a tin, nothing more. More important it will not try to download the Internet every time it runs.

The beginnings

First of all, if you would like to follow me with this article, grab yourself installation of Gradle. It is self-contained zip, and the only thing that you would need is Java installed.  Verify your Gradle installation by typing gradle –v from your command line.

Gradle expects your build scripts to be in a project folder in a file called build.gradle. You can write your scripts in another file but every time you execute Gradle you will have to specify where your build script is: gradle –b file_name.gradle.

To execute a task defined in build.gradle file you need to type: gradle taskName.

To see the list of all available tasks in for project type gradle tasks from command line.

Write you some tasks

Gradle has a concept of a task. Task is combined of multiple actions. One can define a task as new and assign some actions to it, or use predefined Types of task (Copy, Exec, etc.).

Example of new task definition:

task doStuff << {
  // Hey hey, I’m doing stuff
  println ‘Doing stuff’
}

Example of task that copies files:

task copySomeThings(type: Copy) {
  from ‘source’
  into ‘destination’
}

There is a very subtle difference between those two ways of defining tasks, and I got caught many times by it. The first task, doStuff doesn’t have predefined functionality. Calling method task doStuff creates task with name doStuff. However, I need to define some actions. This is the role of operator << (shift left). What actually happens is:

  1. Task doStuff is created
  2. Action that is defined in closure (between two curlies, {}) is appended to the end of the actions list of this task.  First and only action that will happen will be printed out into STDOUT.

If I need another action to follow the thirst one I defined I could do:

doStuff << {
  // Wow, now I’m doing another action
  println ‘Weheeeey’
}

The definition of copy task however doesn’t contain << assignment. It does contain the closure though. This closure is passed into the task Copy to configure it. from and into are methods defined on task type Copy that can be used to specify where to pick up files from and where to drop them. Every predefined task has some parameters and methods that I can specify. Please refer to documentation  (link to Gradle task list) for details of task.

This is important

The most common mistake I kept on making was defining a custom task and forgetting the << operator. The task did nothing and I was spending countless hours investigating why.

task doStuff(){
  // this will not happen
}

Task dependencies

In Gradle I can define dependencies between tasks. This means that when I want to execute specific task and there is another one that needs to be executed before it, Gradle will execute it too. The way to define task dependencies:

task doStuff() << {
  // I’m doing stuff
}

task doingEvenMore(<strong>dependsOn: doStuff</strong>) << {
  // Doing more
}

You can also specify name of the task instead of the task reference. This allows for kind of a lazy evaluation of build script.

task doingEventMore(dependsOn: ‘doStuff’) << { }

If you need to add dependency for already defined task you can use dependsOn method of a task.

doingEvenMore.dependsOn someOtherTask

Or dependsOn property of a task:

doingEvenMore.dependsOn = [doStuff, someOtherTask]

There is a catch with the last method: it overrides all previously created dependencies.

Then, there was Java

As of now I was describing how to create tasks and declare dependencies between them. To actually use it on a project we will need some more action. That’s why it is time to introduce Gradle Java plugin.

apply plugin:’java’

Java plugin adds some task to your build. You can check them out by executing gradle tasks from command line. Tasks that can compile, test and even jar your project.

What we are interested in are dependencies that project might need and the way Gradle handles them. By dependencies I mean third party libraries like: log4j, junit, etc. You can see dependencies in your project by executing gradle dependencies from command line.

Dependencies

Java plugin adds few dependency configurations. I’m interested in compile time dependencies, as it is needed for my project to compile and run.

apply plugin:’java”

repositories {
  mavenCentral()
}

dependencies {
  compile group: ‘log4j’, name:’log4j’, version: ‘1.2.9’
}

Inside repositories block I used method mavenCentral(). This is method predefined by Java plugin providing access to Maven central repository. As I mentioned earlier Gradle uses Ivy to resolve dependencies. Ivy in turn works rather well with Maven repositories.

Lines above will add single log4j dependency to mine project. The cool thing about it is that it will also resolve all its dependencies.

We can also add multiple dependencies by doing:

dependencies{
  compile(
    [group:’log4j’, name:’log4j’, version:’1.2.9’],
    [group:’xfire’, name:’xfire’, version:’1.2.6]
  )
}

This will add two dependencies to my project.

There are few more dependencies (runtime, compile, testCompile, testRuntime, archive) added by Java plugin. Dependencies are nothing more than a list of libraries (files) included in a build lifecycle (compile, test etc).

Configurations

One can define its own dependency configuration by creating new entry in configurations block of a build script.

configurations {
  gregWasHere
}

dependencies{
  gregWasHere group: ‘log4j’, name:’log4j’, version: ‘1.2.9’
}

Configurations are nice and simple way of adding compiletime or runtime libraries to any build. For example I used it when executing external Java process that needs extra libraries in classpath.

task executeSomeJava(type: JavaExec){
  main = “com.some.main.Bla”
  args = [“1”, “2”]
  classpath = configurations.gregWasHere
}

Summary

Gradle is really great and if you are still stuck in the world of XML and hate it, give it a try. Few tips I written in this article, could be used as a good starting point. I also found that coding to task convention that Gradle uses, simplifies the build and release process.

Few good resources to read when starting with gradle:

Broken Maven repository and Gradle dependencies

Few days ago I got into trouble when building project using Gradle.

Created deployables (fat jars) looked fine when I build it on my local machine, however when I build on remote box (Linux) I was missing some dependencies. The build scripts were exactly the same. The only difference was: the remote box didn’t have local Maven repository. This shouldn’t cause any problems as remote repository should be the same.

Gradle, a better way to build

However 🙂 on the project that we are working, the remote repository is managed by team and it is in our internal network. It also doesn’t proxy to Maven repository.

Some of the artifacts that got uploaded to that repository were missing pom files. When Gradle (via Ivy) was resolving the dependencies it created pom file on the fly with no dependencies on other artifacts.

When I discovered the problem I uploaded missing pom files. It didn’t fix the problem though. As it turns out, Ivy cached the self created pom files in USER_HOME/.gradle/cache folder. Running gradle with -C rebuild option doesn’t solve the problem as this option only clears the cached Gradle scripts.

When I deleted the folder USER_HOME/.gradle/cache, Gradle got all the dependencies resolved properly!

I was using Gradle milestone 3.

I hope you won’t get stuck on the similar problem as I did. Maintain you repository or use public.

Greg