My Personal Kanban 2.0 Beta, Open Sourced

The year 2020 brought the opportunity to spend time learning new skills. I picked the old pet project, My Personal Kanban and decided to rewrite it with a completely different technology set. 

Here it is, version 2.0 of My Personal Kanban. This time, it’s a standalone app, running on MacOS, Linux and Windows

I’m using the app instead of a real-life Kanban board for my Personal Kanban. If you are not familiar with Personal Kanbans and why they are suitable for Personal Productivity, I recommend this short article with a video explaining why Personal Kanban is excellent. 

A bit more about technologies

My Personal Kanban 1.x was a single page web app using local browser storage and suffered from never-ending cross-browser compatibility issues. I also delivered it using Angular 1.x of which I was not a big fan. 

As I saw beautiful applications written with Electron framework, including Visual Studio Code or Slack Desktop client, I thought of learning Electron myself. 

In the end, I landed the following stack:

  • Electron – it’s a framework for building cross-platform desktop apps with web technologies. It helped me to focus on building functionality, without worrying about cross-browser compatibility. It also made it easy to write the content of boards to the file system.
  • TypeScript – it’s a programming language, that brings type system to the power of JavaScript. I spend a lot of time at my job Java or Kotlin, and I like having type system to hand. Also, it was an excellent excuse to learn another language. 
  • ReactJS – it’s a JavaScript library for building User Interfaces. It was not my first contact with React, and I liked it from previous projects. However, this time I used it using functional style. 
  • Material-UI – it’s a library of React Components. I used the included Material Design style.
  • electron-react-boilerplate – it’s a boilerplate code, including all of the above frameworks (except Material-UI). It gave me a great starting point. 

I open-sourced the entire code at GitHub. And you can fetch the latest binaries from the My Personal Kanban 2.0 page.

Please get in touch via GitHub or the comments section if you have ideas about features or improvements to the application. 

Screenshot of My Personal Kanban on Mac

Controlling central heating with Arduino and Raspberry Pi


When Arduino and Raspberry Pi released first versions, I did buy one of each. Being a gadget man and … well, a man, I played for a bit with my new toys and left them in a drawer.

Time has passed and not much happened with any of them. As I became increasingly unhappy with the central heating controller in my current house, I decided to take the Ino and Pi out of the drawer and actually build central heating controller that I would be happy with.

The design phase

First requirement of the new heating control system was the least intrusive installation as possible.

The dial thermostat that I have at home, works as a simple switch: switching the heating on when temperature falls bellow pre-set; and switching heating off when temperature rise above another pre-set. I decided to use this simplicity in my design. All I needed to do is hook with one 230V cable into that thermostat (230V, hell yeah).

With entry point sorted, I went into the controller bit. Arduino board will control the Relay, which will simply switch heating on/off. For the temperature reading I chose the Digital Thermometer which offered more stable reading than the Analog one (included in Arduino Uno starter kit). I’ve also added LED to indicate when the heating was on.

Leveraging serial port used to program Arduino, I decided that the board will send temperature updates and receive setup command from Pi via USB connection. It will also be powered via the same. This also solved a problem of 2 separate power adapters for both Arduino and Raspberry Pi.

The build phase

I’ve been trying few things before arriving with the below solution.

Electronics

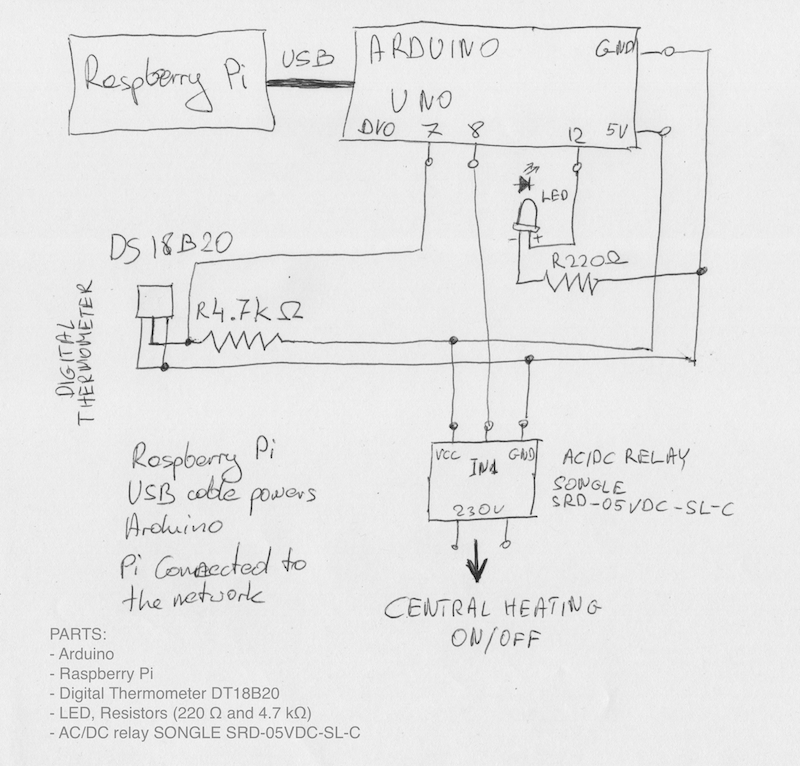
The Arduino circuit is very simple.

circuit-smaller

Three elements connected to Arduino with a couple of resistors, not much.

The LED is not necessary, it’s there to indicate when the heating is switched on.

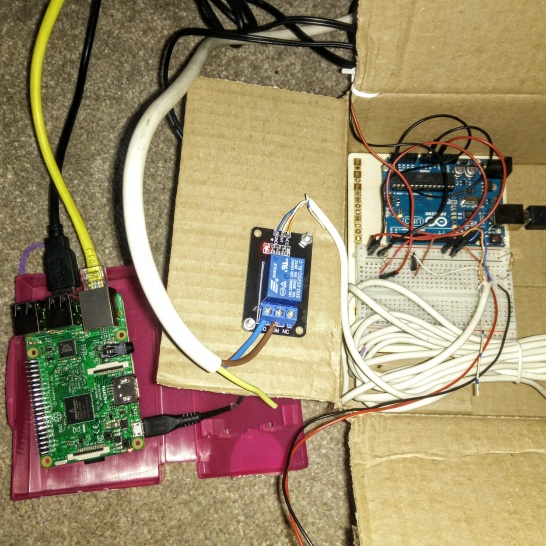
The final prototype doesn’t look very attractive, but the lot is hidden under the furniture and the only elements sticking out are the temperature sensors and a bit of LED.

Final prototype of my controller


Software

I had to write three separate pieces of software:

Arduino

For the temperature sensor I included two extra libraries, the OneWire protocol library and a DallasTemperature sensor library. I use 0.5 centi-degree approximation of a temperature reading.

Temperature reads are sent via Serial Port on every loop. Arduino also expects the Float number on a Serial Port. The received number indicates the desired room temperature for Arduino.

To limit the sensor reading fluctuations, the control of relay changes after at least 10 successful consecutive reads of the same temperature from the sensor.

Raspberry Pi

The software that runs on Raspberry Pi does the following:

  • It waits on the temperature updates from Arduino, and stores the Updates in Memory (for the latest update) and in simple file based H2 database (for historical data),
  • It exposes REST API for UI to get the temperature information and receive the new settings,
  • It schedules temperature changes according to schedule stored in the JSON file.

I started the code in Python, but it was running slow. I did a simple comparison of execution time for Prime number algorithms, and Java 8 was beating Python. On a single core Raspberry Pi 1, it was a good incentive to change the platform. I chose Kotlin programming language as it was new to me and I wanted to learn it.

As a framework for Event driven application I choose Vert.x 3. For Serial Port communication, a bit dated RXTX library.

The UI / Phone controller app

The Web App I build works on computers as well as mobile devices. I did choose React as a UI framework with Material UI components. The lot is build with Webpack into a small set of html/js files.

The testing phase

The testing phase involved connecting everything together, starting it, and hoping that I will not sense the smell of burning electrics and experience no explosions. In other words, a standard scientific and engineering approach 🙂 .

I do run the setup for 4 weeks continuously and it not failed so far.

Summary

This is the first time I used my skills to build something that interacts with physical world. It gave me a great feeling of achievement and satisfaction. I know that I could buy something that looks much nicer and probably works better but I learned a lot during the process.

Raspberry Pi 3 was released while I was building my design and I switched to it. You can see it in the pictures. I also want to switch Arduino Uno prototyping board to Arduino Nano.

All the code and more detailed technical description is available for you to grab from my GitHub repository on https://github.com/greggigon/Home-Temperature-Controller .